
INDEX
About DoPricer CPQ
1. Connect DoPricer CPQ to your HubSpot
2. Install, Re-install or Uninstall DoPricer CPQ on HubSpot
3. Test your Master Switch in your App Settings
4. How to Setup Company View for managing DoPricer Discounts
5. How to set a default discount per company
6. Setting up Custom Price Lists - contact support@hubdo.com for assistance
About DoPricer CPQ
DoPricer CPQ enables users to easily manage Customer Discounts & Price Lists without leaving HubSpot
- DoPricer automates customer pricing in HubSpot, applying each customer's agreed discounts and prices instantly, saving time and avoiding overcharging.
- DoPricer can be added to any HubSpot portal but is best suited for Professional and Enterprise Editions due to the Product Library available in each.
- DoPricer discounts and price lists work well with HubSpot Quotes and 3rd party integrations including PandaDoc, for sending accurate quotes fast.
Connect DoPricer CPQ to your HubSpot:
Follow these easy steps to connect the App to your chosen HubSpot account. The button below will open the DoPricer App on the HubSpot Marketplace (in new window) so these instructions will stay put!
First: Create your DoPricer free trial subscription:
1. Install DoPricer from HubSpot Marketplace or use this link.
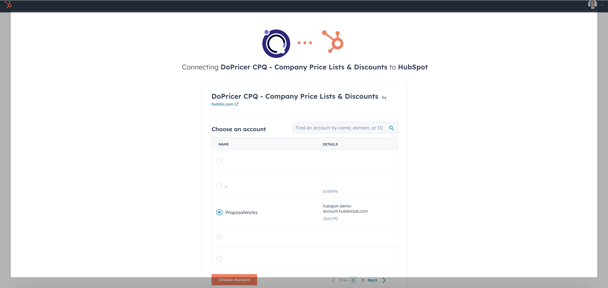
If presented with several HubSpot portals, select the correct one to match the Portal ID you entered earlier. Then press the button Choose Account
Tip: You must be a Super Admin in your HubSpot portal to install an app
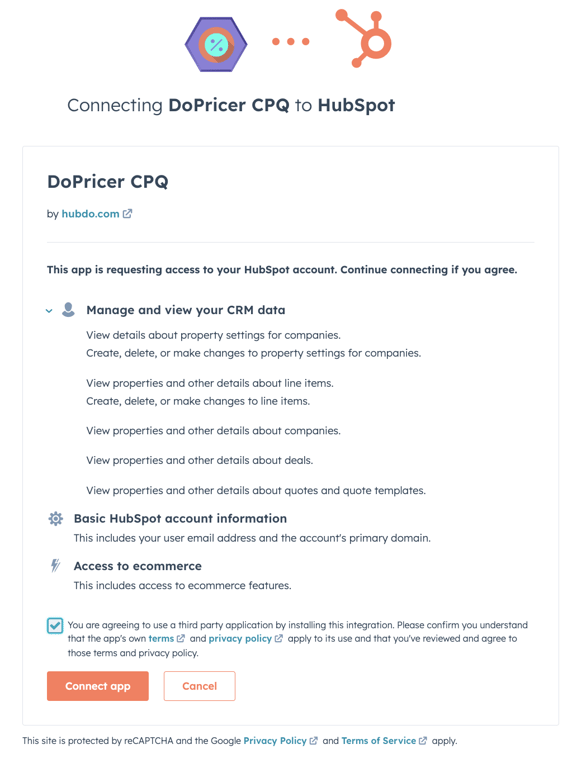
Click > Connect app
Now, you can return to our support documents for the configuration of DoPricer in the HubSpot portal.
Install, Reinstall or Uninstall DoPricer CPQ on HubSpot
- Install or re-install DoPricer via this link
- Uninstall DoPricer in your HubSpot Settings > Integrations > Connected Apps
- On the DoPricer app, Click Actions > Install
- Note: Your DoPricer settings are preserved if you uninstall and reinstall
Test your Master Switch in your App Settings
Toggle the DoPricer Master Switch. Make sure that it is ON

Tip:
- When master is OFF, DoPricer takes no action in your HubSpot portal and does not process any deal line items. Use this to temporarily disable the App if required. No need to uninstall and reinstall
- When master is ON, you can still disable DoPricer on each company by setting the company property: DoPricer enabled = OFF.
You will not be able to activate your master switch if your subscription is canceled or suspended. Contact Hubdo Support if unsure.
Setup Company View for managing DoPricer CPQ Discounts
Make it easy to manage all your Company Discounts in a single HubSpot view, much like a spreadsheet.
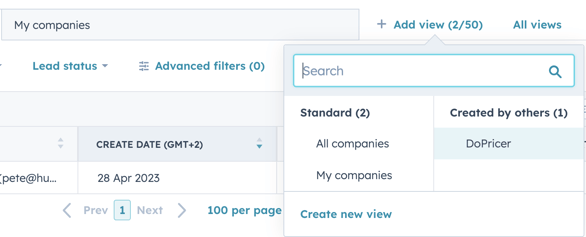
- From your HubSpot top menu, view Contacts > Companies
- Add a new tab by clicking + Add View > Create a new view
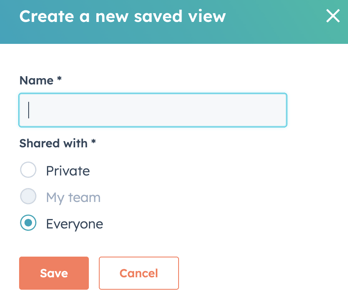
- Name your view. For example DoPricer
- Choose Private, Team (if you are a member) or Everyone
Tip:
- If you do not want regular users to see and potentially change discounts using this view, mark it Private. You can change this later.
5. On the far right-hand side, click Edit Columns.

6. On the right side, remove all selected columns, leaving only the Company name - screenshot below:

7. On the left-side panel (screenshot below), scroll down to the DoPricer section and add the following in this recommended order:
- DoPricer Enabled
- Discount by Product Items
- Discount Default
- Click Apply
- Click Save View

8. Adjust column widths or add more columns to suit your preferences
-
- Click any column heading to sort by that column
- Edit cells directly in this view, much like a spreadsheet
- for example DoPricer Enabled = On or Off
- Remember to click Save
- DoPricer must be ON to apply discounts or prices to new line items on deals or quotes for that company.
9. Use this view to easily edit and enter your company discounts per company here - similar to editing a spreadsheet.
How to set a default discount per company
The DoPricer CPQ default discount is set in the Discount Default property per company and applies to new line items on the deals for that company.
Note: DoPricer CPQ must be enabled for that company. DoPricer enabled = ON.
If a Product Item Discount or Product Category Discount exists on that company for a given line item, it will take precedence over any default discount.
- Enter a number in the Discount Default property, which is found in the DoPricer group of properties for each HubSpot company.
- The number you enter represents a percentage discount applied to the price on each new line item on a deal.
- For example 10, represents a 10 percent discount (10%)
- The only company discounts applied by DoPricer, are those stored on the Primary company associated with the deal.
- The number you enter represents a percentage discount applied to the price on each new line item on a deal.
- There are several easy ways to set the Discount Default company property
- View properties on a single company, set the Discount Default property, and save
- From Company List View with the Discount Default column visible, directly set an amount in the property cell for a single company, and save.
- From Company List View:
- select one or more companies
- Click edit
- Choose Discount Default
- Enter a value, for example, 10 (for a 10% discount)
- Click Update
- Use a HubSpot Company Workflow to set the Default Discount property, based on the trigger and rules use 'add to the workflow'.
- Once a value is set on a Discount Default company property, DoPricer will apply the discount to a line item under the following conditions:
- The App Settings DoPricer Master Switch is On
- The company property DoPricer Enabled = On
- The company has no Line Item Discount which matches the line item SKU, as that takes precedence over all other discounts.
- The company has no Category Discount which applies to the line item product category, as that takes precedence before Default Discount.
Congratulations! You're ready to start using DoPricer for all Deals and Quotes.
To activate & configure Custom Price Lists use this Help document.
For Per-product-category Discounts contact HubDo support on live chat or support@hubdo.com